
24V to 12V 5A 10A 120W DC DC Converter Step Down Daygreen 1A 2A 3A 6A 8A Voltage Regulator Newest Type CE, 10,000pcs in Stock (WHL #44)
[Just updated to WordPress 5.0 – slight errors in the Matrix might occur]
Overengineered parts from China aren’t really my cup of tea, but this is for an upcoming project with power-hungry, rotating AND rusty plates, so I figured I would use something up for the task…
…and I don’t think I paid that much of a premium for it. So today’s item is a step-down converter model “D121” rated 10 amps at 12V, with 15-32V input voltage. Price was 2.86€ at the time; contrary to the usual item on this site, this was without shipping cost. It seems the manufacturer runs its own shop on AliExpress and charges an unusual 3.49€ for shipping. They also seem to have local warehouses as they offer shipping from Germany (at slightly higher item cost due to VAT I guess, but shipping is more than 7€, which is higher than most regular shops charge for decent sized commercial parcels), as well as from the US and Australia. I picked regular China shipping, but I also bought another converter (hint, hint), so that lowered shipping cost per item quite a bit.
Anyway, here’s the brick:

Die-cast aluminium body / heat sink, two mounting holes, beefy cables attached to the epoxied body. I would have preferred ordinary terminals in order to attach your own choice of wiring, but that’s what it is, and I think I can deal with them. Also, it is rated at IP68, which could be difficult to achieve with bare metal terminals ![]()
Mounting holes are like 6.5 to 7mm in diameter, could be 1/4 Yankee thumbs instead of a metric size.

Wire material is unfortunately aluminium, but it is 16 AWG (1.3mm²) with thick isolation, so that’s decent for the 10 amp rating.

Now when it comes to mounting, I’m not sure if the back of the unit is ideally suited for heat transfer. As you can see, it does not sit flush; instead, the mounting holes have protruding rings and the gunked center of the unit is not filled to the brim. However, as efficiency is top-notch (as I will demonstrate in a second), there should never be the need for additional heat transfer to the mounting point, as there will be plenty of heat radiated from the top heat sink already. Still, would be nice for a safe mount to have a flush surface instead of two elevated rings from which the unit could wiggle loose over time. I might sand them down prior to final installation, which shouldn’t be a problem.

Appearance aside, let’s talk about operation. That thing really astounded me. The seller praised “95%” efficiency in the item description, as well as 120mVpp ripple, 0.2% line regulation, load regulation and 1.5% voltage accuracy. I would have guessed they coined their no-load 12V voltage regulation “voltage accuracy”, and the others are regulation under load and varying power input circumstances, but it seems to be the other way round. Well, the unit didn’t get warm – the external power brick did. Quite a bit ![]()
I’ve only tested this unit up to 6A = 72W out, as that’s the limit of the “19V” / 80W (yes, 80W) laptop power brick that I used. I don’t think I have much more powerful supplies with more than 12V output at hand, and I couldn’t be bothered to modify some server power supply to crank the output to 15V. If you want to help me out in that regard, please let me know ![]()
So here’s the input vs. output graph – I figured plotting input amps vs. output amps would be too much axis confusion for one plot. So that’s all plotted against the output current for simplicity. Coincidentally, every amp of output current is also 10% of total allowed load, so I can basically plot from zero to 60% load. Again, help me out if you want to see 100% or more ![]()
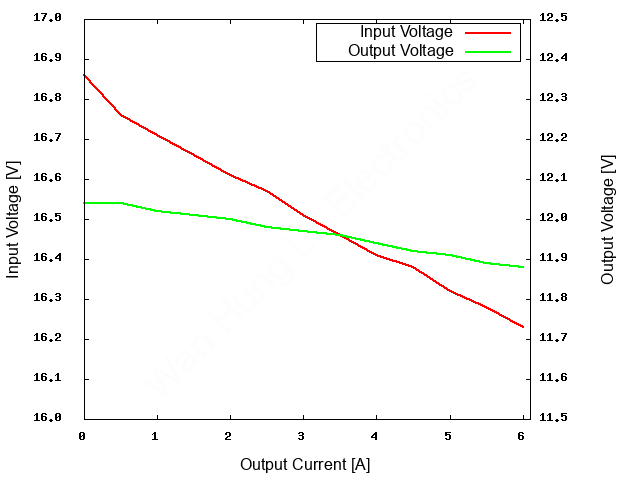
Power regulation of the input is much worse than the regulated 12V of the output, which probably is due to cable length. On the contrary, that would be the same on a laptop, meaning the voltage drops significantly when power is needed the most, making this a sub-par power supply. It’s useful for testing, but I wouldn’t use it any more on a production machine. Load regulation of the step-down however is pretty good – 12.04V in the no-load case, down to 11.88V at 6A. That’s inside the 1.5% spec. Not sure if that is still the case at 10A / full load, but that is certainly good enough for me. ATX 12V spec for comparison is 5%, meaning the 12V rail can be anywhere from 11.4V to 12.6V.
With voltage and current readings, there’s power to be calculated…and from power in and power out, we got efficiency. I didn’t calculate this when I measured it, so that was a big surprise once I ran the numbers. Have a look:
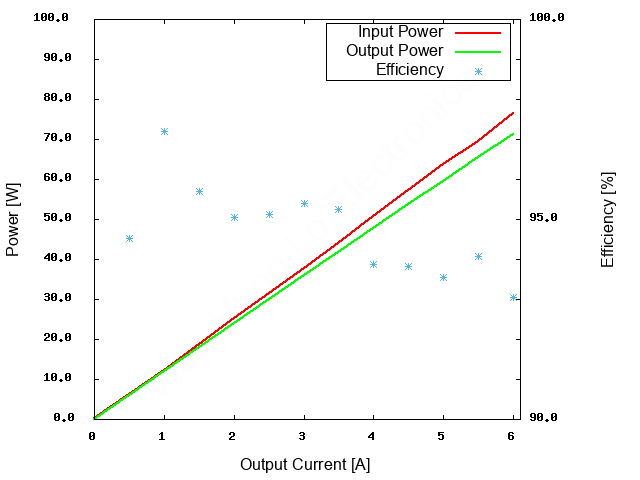
That thing actually IS in the 90%+ range! I mean I felt it when the unit didn’t get hot under load, but boy did I not believe the marketing numbers. Well, even with some percent measurement errors (True RMS, ahem…), that buck converter is pretty sweet!
Let’s talk about ripple. The ATX specs also defines ripple, and this time their 120mVpp figure is the same as the specs on this converter. It is confined to the 20 MHz range, I didn’t bother to enable the 20 MHz bandwidth filter in my scope, so my readings are a tad higher. Here’s the no-load image:

35mVpp; however, at 100 kHz. The manufacturer claims this one runs at 50 kHz. Well, I don’t care much about the switching frequency if it does get 90%+ efficiency and doesn’t violate CE, FCC and whatnot radiation limits…
Ignore the hardware frequency counter this time, it’s gone totally bananas with all the spikes inside the wave forms.
1A: 55mVpp. Notice some overlay crap which will get a bit worse with more load. For that, I did two images for every load situation after this.

2A: 65mVpp (47mVpp zoomed in)


3A: 65mVpp (45mVpp zoomed in) – basically the same as 2A


4A: 65mVpp (49mVpp zoomed in) – the same, once again


5A: 72mVpp (54mVpp zoomed in), now there’s some additional crap appearing, mostly in the zoomed-in view


6A: 80mVpp (70mVpp zoomed in)


Ripple really starts to increase now, but this could also be an effect of mediocre input noise rejection and/or input capacitance. After all, at this output power the external power brick runs at 16.23V and 4.72A, when specced 19V and 4.22A, so technically close to the rated power and well above the rated current. I wouldn’t be surprised if that, combined with aged output caps, would lead to horrendous “19V” line regulation which partially passes the step-down converter. Still, at 80mVpp we’re in safe distance to the 120mVpp spec.
What can I say, I’m highly pleased with the results and I will torture the other converter the same way. I’ve just ordered another cable for the 12V/5V project, so that second review should bridge the time until it arrives. See you then!
[…] time we got a 5V/10A converter from Daygreen, model number B10-1224-05, shipped together with the 12V/10A unit from WHL #44. This item was 2.41€ excluding shipping, as described in that blog […]