
The Ender 5 Plus and a pack of RGEEK High quality 6.0 W/mK 200*400mm Thermal conductivity CPU Heatsink Cooling Conductive Silicone Pad Thermal Pads (#E21F4)
Someone was lazy and skipped the last four blog posts
So, let’s jump right in, the Ender series is probably good for another dozen posts. Today I’ll give a quick assessment on the use of silicone pads for the build plate.
The Ender 5 Plus (and many others) uses a 24V 400ish Watt heating plate that is screwed onto a sheet of aluminium, that is in turn mounted to the Z axis assembly of the printer. On top of that, a textured glass plate is “fixed” by some binder clips which I somewhat dislike. There is no solid connection between those – the clips press down on the glass on four corners, but that’s about it. While glass should be pretty even, both the heater and the aluminium plate are probably not. So if they aren’t in direct contact, heat transfer will be pretty poor (in addition to the fact that glass in itself is a poor conductor of heat).
Some people have added thermal grease to their build plate, but that is a mess on application and a terrible mess on removal. But I’ve seen the patchy heating pattern of my build plate and thought about my options. One of them is a more massive aluminium (or copper..or silver ) base plate to spread dissipation. That doesn’t however solve the conduction problem when the glass is not in contact. Silicone pads however might do – so I ordered two 400mm x 200mm x 0.5mm pieces from AliExpress. Price was 16,25ish € including shipping and delivery was completed in less than two weeks. These sil pads are often used by lazy computer OEMs to either replace fluid thermal grease (cheaper/faster application), or to compensate for differences in chip height, which isn’t the case here. So the thinnest sil pad available was my best choice. The Ender 5 Plus build plate is shy of 400×400, but excess material is easily removable. Sure, four units of 200×200 would have been cheaper, but they are a pain to align, so I actually would have preferred a 400×400 pad…which is unobtainium from regular AliExpress sellers, unfortunately.
Well, let’s apply the pads:

They have a sturdy plastic film on both sides, which protects the (somewhat sticky) pads from dirt and dust. The film is also perfect to move out air bubbles with a squeegee – but unfortunately it sticks so well to the pads, and the pads stick so poorly to the aluminium plate, that on removal of the top layer of film, it draws in air bubbles again. Bummer. I’m also not sure if any lubricant will help here or just destroy the silicone material in the long run, so I didn’t really apply soapy water or anything like one does when e.g. wrapping things (uuh #P15 comes to mind)

I almost made i without damage to the pads, just a tiny overlapping speck near the center came off due to these apparently being cut by hand. Adding the glass plate back to the assembly isn’t trivial, but doable. Any attempt might however cause additional bubbles or even tear the pads, so check thoroughly before setting down more than one edge. Trimming excess on the sides is done within seconds. Adhesion is pretty good once everything is set, it might even do without the binder clips, but I fear any forced sideways movement (hitting a print!) might be fatal for the pads, so the clips will stay on for now.

Well, is it any good?
Build plate was set to 80°C, which is at least 10K higher than I usually use for PETG prints. The fact that temperature reading barely passes 70°C makes me think about moving the temperature sensor if that is possible.
It certainly evens out the patches a little, and the effect on the three slightly recessed screws on each corner is still visible past the 5 minute mark. However, it’s not a day-and-night difference, especially the top right corner is still noticeably colder due to the heater being attached there – less heating power per area, plus maybe a little heat drain over the wiring. I’d say after 10 minutes of heating, results are pretty equal. But I’m usually not that patient, and the better distribution could be very useful for the initial layer that will be laid down just a couple minutes after starting the bed heating.
Heating speed is indeed a little reduced which is both expected and a good thing – since heating power is the same, that just means something is gulping up those precious Joules. And since room temperature was somewhat similar between the tests, this has to be a combination of the sil pad (as an additional thermal reservoir), as well as the glass now having better thermal contact overall. Everything posing as a more uniform block with higher thermal mass is exactly what I want for a heating bed.
Snapshot:

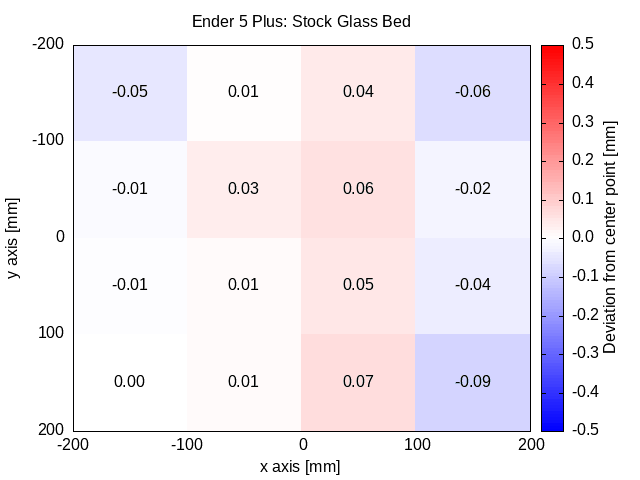
A different, but related topic is planarity of the bed. With just the glass sitting on top of a (ever so slightly) bent and buckled metal base, I do notice some sagging via the BLtouch readings. Could be the rails/aluminium extrusions as well, though. With some material sandwiched in between glass and heater, there is a chance for better overall heat distribution. I’m working on a nice gnuplot representation of that – let’s just say the original standard deviation was 44µm, and when I put everything back onto the printer I ended up at 64µm before twiddling any knobs. So that’ll do.
Here’s the plots: Before:
And after:
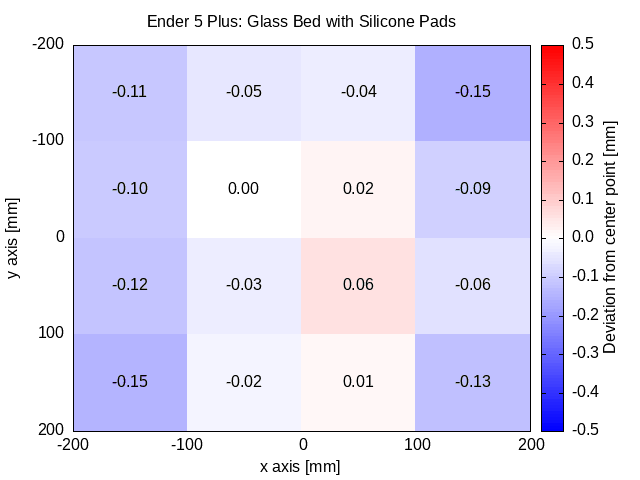
Again, this is without any form of tuning, all pieces have been handled for an hour or two and certainly been screwed down with different torque than was applied before. There seems to be a small bulge in the center instead of an off-center bent to the right. That’s likely fixable, maybe all it needs is a less sturdy replacement for the binder clips that bend down the corners of the glass plate. Happy with that.
Does it also decouple the build plate from the base in terms of noise and vibration? Probably, as it is a malleable, soft material in between hard surfaces that would otherwise have direct contact. But it’s also on a scale I won’t bother to even quantify. I do have the occasional rattling noise from the nozzle grinding over protruding bits of the current layer, yet this is not the cure for it. The printer doesn’t get any louder with this, but silicone pads over the heater plate is not a silence upgrade, period.
What’s the verdict? Well, if you’re patient, then don’t bother. Just pre-heat everything as usual, this mod won’t have any impact. However, if you start printing right away once the bed has “reached” the desired temperature (as in: Marlin M190 – Wait for Bed Temperature), this might be worth the money. It evens out temperature differences on the build plate in the most critical phase, that is, the first layer. At 16€ for the massive Ender 5 Plus, or likely half that for smaller printers, it’s worth a shot. And: It’s a clean upgrade and won’t cause sticky fingers and endless oozing left right and center, like regular liquid thermal paste would. So while I wouldn’t do this as the very first upgrade to a new Ender 5 Plus (or similar), it would be on the medium-term shopping list.